| |
Traditionally teeth were drawn or photographed, but digital scanning has proven to
be the best means of (casually) capturing a tooth-design. The lighting is consistent,
special lenses & expertise are not required and the results are immediately available
for digital transport.
Even the best scanners can produce poor images, and post-processing can easily damage
excellent images. The below tips are based on personal experience creating images
and adapting the images of others to the ELASMO.COM website.
Resolution
Optical versus Software. Most scanners note two resolutions, their optical and the
increased resolution provided by their software. When I refer to resolution, I am
always referring to 'OPTICAL'.
The highest resolution is always best, but file size becomes a constraining
parameter. If an image is to be used on a website (not printed) the highest resolution
is often not required. The below chart reflects my general preferences, but as a
rule-of-thumb I wouldn't go lower than 600 dpi on a shark tooth.
| |
Item Size |
Best |
Good |
Poor | |
| | 2 - 5 mm | 2400 | 1200 | 600 | |
| | 5 - 15 | 1200 | 600 | 300 | |
| | 15 - 50 | 600 | 300 | 150 | |
| | 50 - 150 | 300 | 150 | | |
| | 150 + | 150 | | | |
Note: These values are based on a complete specimen. If a portion of the specimen
may need enlargement (i.e. a tooth in a jaw or serrations on a tooth), then the
resolution should be based upon the area that requires enlargement.
Sharpening
Never sharpen an image! The final product can be sharpened, but once an image had
been sharpened it can't be resized without a drastic loss in resolution. (A sharpened
600 dpi image is of less value than an unsharpened 300 dpi image.) Some scanners have
check boxes or other options that provide for automatic sharpening and image
"enhancement' -- do not select these options.
Remember, there is no way to recapture the image data lost during the sharpening process.
File Type and Compression
For local processing, the .TIF format is the best. These files can be 10 times the size
of .JPGs, so e-mailed images should usually be .JPGs only. If dealing with black & white
drawings or those where text is important, .GIF files usually prove best. If your software
allows you to select the quality/compression (file size) of the .JPG output, select a
low compression (high quality). Again, the less image data lost, the better. For example,
on my image processing software (PaintShop 5.0) I can select relative compressions from
0 - 100%. For original images, I usually stick with 0-10% compression. When a final image
is created for a website, an isolated teeth on a monochrome background can normally be saved
at 30% compression while a busy background might support 50%. Best bet is to go with the
lowest compression for a particular file type.
Orientation
The scanners I've used have proven to have a directional light source -- the final image
shows the light source to come from the rear (cover hinge) portion of the scanner (this
is good). Maybe all scanners are this way, I don't know. However, I'll use the term "TOP"
to refer to the direction of the scanner's light source.
Unless certain details must be captured that require special orientation, the specimen
should be oriented with the light source coming from the top, top right or top left of
the specimen (I prefer top right, but top left is used by many). (If multiple views are
included, the orientation should remain constant.)
If it is unknown whether a tooth is an upper or lower, I'll default to the orientation
which provides the best image. With flat teeth (i.e. Hexanchus, Carcharhinus) the best
image is usually root to the top (upper perspective) while deeper teeth (nurse shark,
most rays, etc) are best oriented root down. In most cases, these deep teeth are best
imaged roots down, even if they are known to be uppers. Tooth orientation is important,
but it is of no value if the resulting image is of poor quality.
Perspectives
The number of perspectives needed varies greatly. The labial view is particularly useful
when attempting to identify file position of a known species. However, most teeth can't
be identified as to species based on this single image. When attempting to identify a
species, three aspects are best, labial, lingual & lateral. Certain deep-toothed species
(Orectolobids, skates, etc) should include basal views of the root-design. A rule-of-thumb
for the minimum might be: Sharks - lingual & lateral; Rays - labial, lateral & basal.
Background
The main purpose of the background is to differentiate the marginal contour of the tooth.
When the scanner's cover is up (not closed) the background is usually dark, nicely
offsetting most teeth. Dark teeth that require a light background usually call for the
cover to be closed, which often produces shadows. In this case, covering a specimen with
a material that diffuses light (cotton or its plastic counterpart) can prove useful.
Scalebar
When scanning images for personal use, knowing the image's DPI is all that is important
(a digital scalebar can be added to the image). However, an image provide to another
should include the relevant scalebar with the image. The scalebar should be metric
(mm with teeth).
Post-processing
It is very tempting to "improve" an image. If the image is a final product, this is
appropriate. However, if it is being forwarded to another who may be manipulating it
for reuse, it is usually best to attempt no post-processing.
Image Attribution
An image (drawing, scan or photograph) is assumed to be the property of its creator.
Images processed/refined by another have co-authorship. As an ELASMO.COM 'rule-of-thumb'
the images are usually noted as being "copywrited" by the creator only, even if extensive
processing has been added. If a specimen does not belong to the image's creator, it should
include the name of the collection's owner ('from the collection of xxxx').
File Naming
I don't know how many images I've seen named tooth1.jpg & tooth2.jpg. Most PCs and
software now support long file names, so a descriptive file name (no spaces) can be
very useful. For example, "g_contortus-uprLH-300.jpg" captures species, tooth position
and scanning resolution. If I were to receive that image from Bill Heim, I might add
the suffix "_bh" to the file name. A good naming convention makes it much easier to
find an image on a cluttered desktop. My personal scans carry the index that points to
the full description of the specimen, but will often be changed when forwarded to another.
An Example
In December 2001, I received an inquiry regarding the creation of images for
web presentations. The below explanation might prove useful to others.
I originally used a 35 mm camera (with macro lens) and Bill Heim a scanner to
produce images. Bill's images were better than those I could produce, so I
switched to a scanner 15 months ago. Most likely, the images that you like
were captured with a scanner.
Once scanned, images are then processed manually, the attached image
(scanned this evening) illustrates the steps.
- A) Raw scan from scanner (HP5300C, original at 1200 dpi with software enlargement to
2400 dpi).
- B) Image processed by PaintShop Pro 5.0 -- adjustment to 'Brightness and
Contrast'.
- C) Image manually "cleaned-up" using PaintShop's airbrush (8 pixel airbrush
set at 20% density)
- D) Image rotated to correct position.
- E) Image resized (25%) and "sharpened".
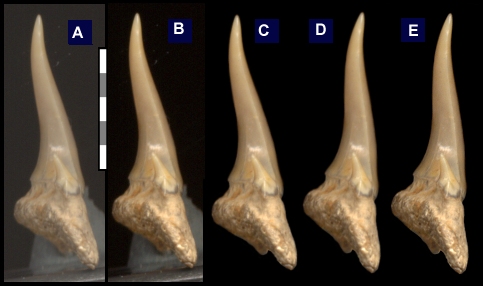
This image (above with 5 views) was captured and processed as a .TIF file. As a .TIF,
this image would have been 201 KB, but it was saved as a .JPG without additional
compression (68 KB). If this image were to be used on the website, it would be
compressed at PaintShop's 30% setting (<14 KB).
The adjoining images illustrate an uncompressed (E, 8K) and compressed (F, 3K) version
of the final image. The loss of detail is only apparent if enlarged. |
 |
 |
|